
An explanation of HIPS
Styrene is the material that I use to construct most of the decks, the superstructures and the fittings etc for my model ships. At your local hobby shop you can usually buy a whole range of styrene shapes including rod, strips and sheets from the Evergreen or Plastruct range of materials.
Although I do use quite a few different sized rods and strips from these companies I find that the large flat sheets of styrene are generally not stocked and when they are they can be pretty expensive. In building my model ships I go through quite a bit of the styrene sheet and buying it all at the hobby shop would send me broke.
Some years ago I found that the answer was to use HIPS or High Impact Polystyrene. HIPS is plastic sheet that is available in a variety of thicknesses from 0.5 mm up to about 3mm and can generally be sourced through sign writers or plastic retailers etc. The large sheets are much more economical to buy than those from the hobby shop. Depending on the thickness that you are after, a sheet 1370mm x 760mm will usually cost between $10 and $30.
I remember a few years ago going from one plastic shop to another around both Sydney and then Perth looking for styrene sheet and the only thing that anyone would offer up was the sheets of expanded polystyrene foam. I eventually came across one company that let me go out the back to the warehouse to see if I could find something that might be a substitute and there on the shelf were dozens of sheets of the styrene that I had been asking for. When I asked the salesman about these sheets he said that’s not styrene, that’s HIPS, so, if you ask for styrene they will probably give you a strange look but if you ask for HIPS there is a good chance that they will have some.
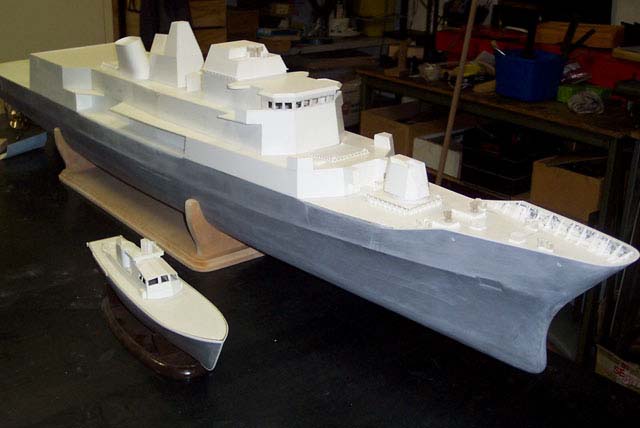 There is a fair bit of HIPS in the superstructure and the deck of a large model ship. In this photo the larger model of the Anzac class frigate is built mainly from 1mm and 1.5mm HIPS while the smaller model of the HDML is made mainly from .5mm and .75mm HIPS.
Working with HIPS
HIPS is pretty easy to work with although it can be very messy when you try to file or sand it. To cut it is a simple matter of scoring the surface with a knife and then bending the sheet away from the scored line and it will snap off for you. I have found that a plastic cutting knife works better than a normal sharp edged blade type knife because it does not force the edges of the cut plastic to rise up but rather removes a small wedge of plastic as it is being dragged along the surface. Thicker pieces of HIPS can also be cut with a saw as long as you go slowly so that you don’t generate too much heat.
To clean up the edges of the cut HIPS I use a file or a piece of sandpaper on a flat surface. HIPS can be easily shaped with normal modelling tools although anything that generates heat will cause problems so be careful when drilling or sanding with power tools as the HIPS will turn into a molten mess very quickly.
HIPS can be glued with a variety of adhesives from specialist styrene glues, epoxy glues, superglue and even contact cement. Hips is also relatively easy to prepare for painting as gaps can be filled and sanded to leave a very smooth surface without too much effort.
HIPS is also pretty flexible so it can be bent into curved shapes without breaking. I find that for tight simple curves two or more thin layers of HIPS glued together produces good results. For compound curves HIPS can be heated and formed over a plug of some sort as shown in the press moulding page. When it cools it will maintain the formed shape.
HIPS can also be built up in layers and carved, sanded of filed to almost any shape. If you are going to build up layers of HIPS the best type of glue to use is one that melts the surface rather than a glue like superglue that adheres to the surface. This is because the glue often sets harder than the plastic and can make it difficult to obtain a good finish to the item being constructed.